Pistol Marksmanship

Diamondback 2/2

Infantry
Verified Military
Joined
Jan 24, 2008
Messages
6,879
Location
Tejas
SSMP
Military Mentor
This is to help out some of the younger or less experienced shooters, just my opinions and teachings. Feel free to pick it apart or add to it. I figured it would be a good thing for some of the younger guys we have on the site and would give some of the old guys a refresher.

Pistol marksmanship is simple in the sense that it can be summed up into four key fundamentals, however it can be very difficult to grasp and/or put together to achieve the over all goal in shooting that the shooter has set. Understanding that goal setting is the key to improvement; shooters must understand how to set proper goals.

Basic level shooter goal: Consistency in grouping at a distance of 25yards, maintaining all shots fired on a 12 inch white paper plate, using slow fire and call your shot drill’s.

Fundamentals of marksmanship:

Position (Grip & Stance)

There are several different positions, stances and grips that can be affiliated with shooting a pistol. However some are simply better then others so we won’t go into details about the other types. We will concentrate on what you should be doing to deliver an accurate shot.

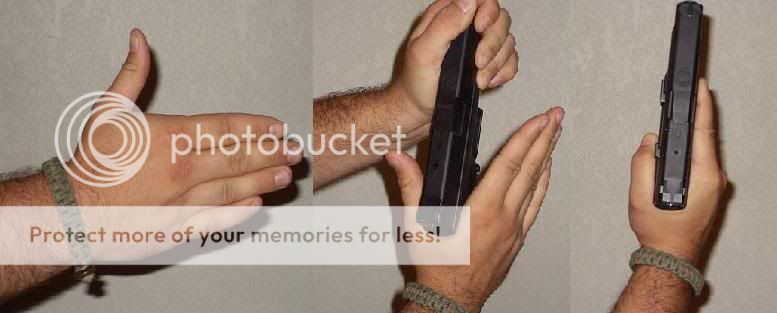
Starting with a one handed grip, take the firing hand and form a salute, separate the thumb from the salute. The meaty “web” portion between the thumb and index finger should be seated all the way into the top of the back strap. Wrap the lower three fingers around the grip panels and place the index finger down “inline” with the side of the pistol. Then allow the thumb to naturally rest on the grip panel (preferably inline with the slide).
onehandedpistolgrip.jpg


For a two-handed grip take the non-firing hand and make a salute, separating the thumb from the salute. Take the non-firing hand thumb and palm and slide it into the open area of the grip panel. Rest the non-firing hand “thumb” directly under the firing hand thumb (pointing inline with the slide “towards the target”). Wrap the remaining fingers around the firing hand fingers.

Twohandedpistolgrip.jpg


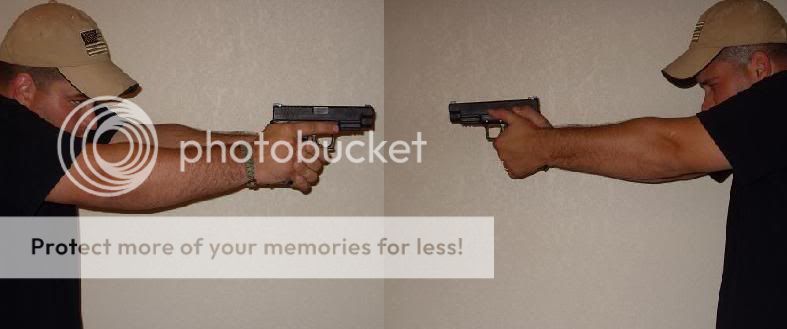
Now to present the pistol, regardless of a one-handed or two-handed grip, lock the arm(s) completely out at a full extension. Raise the pistol until the sights are in line with your vision. If the sights are not already aligned, relax your arm and slightly adjust (right or left) the way the pistol is sitting in your grip. Continue to do this until the sights are aligned every time you bring the pistol up.
Extened.jpg

Stance is based upon many things and in most cases becomes environment dependent; a common practice is to ensure that your stance is aggressive and athletic (commonly referred to a fighters or boxers stance). Now foot placement (non firing foot forward or even across) is not as important as maintaining an aggressive poster. You want you knees to be slightly bent, you want to slightly lean into the pistol at the hips. This will allow you to maintain the position longer and will allow you to absorb recoil.
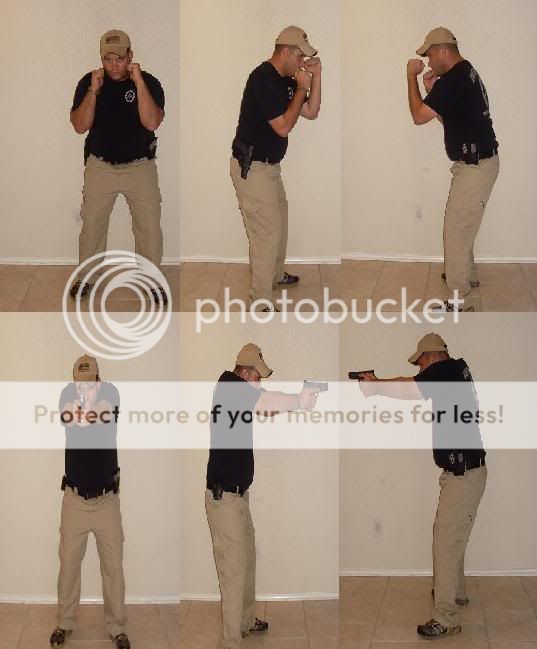

Stance.jpg
 
Aiming (Sight Alignment)

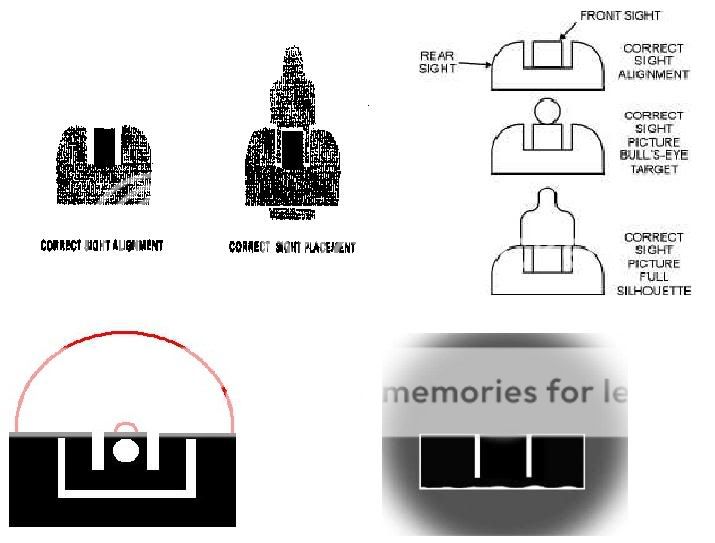
Sight alignment and aiming can very from pistol to pistol. Depending on the type of sights the pistol has and how the sights have been adjusted or milled to the pistol (some sights are adjusted or milled by the owners to get the desired point of aim/ point of impact). Because this is common, I will only go into common factory sights (front sight post and rear sight notch).

The front sight post is at the business end of the pistol, meaning it normally sits on top of the slide, closest to the muzzle of the pistol. The rear sight notch normally sits on top of the slide closest to the back of the pistol.

To align the sights you will adjust the pistol grip until the front sight is as even height with the rear sight notch and even amount of (open space or light) distance on both sides of the front sight.

Once the sights are aligned, the focus point is the top center of the front sight post. Since the human eye can only focus on one thing at a time, the front sight is the preferred focus point due to it being the aiming device closest to the end of the muzzle (as the bullet leaves the muzzle, the front sight is the last ability to steer the bullet).

Now while focused on the top center of the front sight post, you want to point it towards the center of the target (it is important to remember that the focus must remain on the front sight and not shift to the target). The human eye automatically points to things to the center of everything we look at. This is important, because you have to trust this is happening and avoid the temptation to shift focus to the target (it is common to have low impacts on the target when the focus is shifted to the target instead of the front sight).

After we have aligned the sights and achieved the proper alignment of the sight to the target, you now need to check your “Natural Point of Aim” (NPA). NPA is when our body is naturally aligning the sights in your grip, your presentation to the target, and the sights onto the target. In order to find NPA you should go through all the steps of alignment and prior to firing a shot, close both eyes and relax, open your eyes and see if you are still pointed in the same place on the target. If you are not, check to ensure that the sights are aligned when you point the pistol and if they are not adjust your grip so that they are. Then check to make sure your body is allowing you to naturally point at the target. If you are to the left or right of the target, use your feet and adjust your lower body (stance) to properly align the sight to the target. Again close your eyes and relax, reopen your eyes, and again check to see if you are pointing in the proper area of the target.

It is important to know that the sights will wobble in the target area, this is okay and common. Do not try to stop or fight the wobble, allow it to take place. The amount of wobble you have will diminish over time, once your body has become accustom to holding the pistol.

Sightsxx.jpg
 
Trigger Control (Press & Hold)

Trigger control is commonly referred to as “trigger squeeze” that is absolutely not what it is. Trigger control is the movement of the trigger to discharge the pistol, with out disrupting the sight alignment or “aiming”. Then follow through is holding the trigger to the rear as the pistol is discharging the round.

The placement of the trigger finger is important, depending on the size of your hand and the strength level in your hand. In most cases the trigger finger should be placed across the trigger between the tip of the finger and the first joint in the finger. The pad between the tip and joint will rest across the trigger. The trigger finger should not rest along the side of the pistol frame when across the trigger. You should be able to see a separation of the middle knuckle from the pistol frame.

Once the trigger finger is properly placed across the trigger and not in contact to the pistol frame, the movement of the trigger is the next step. Again this is commonly referred to as “squeezing the trigger” but remember, that is not what you are going to do. You are going to start “pressing the trigger to the rear” increasing the amount of pressure until the pistol discharges. Once the pistol has discharged, you will maintain the pressure on the trigger until the recoil has settled and the sights have realigned to the target. Then you will release the pressure slowly, until you hear or feel a click from the trigger. Then you will again add pressure to the trigger (while the sights are aligned on the target) until the pistol discharges again. Again you will add pressure and once the pistol discharges you will maintain the pressure until the recoil has settled and the sights are aligned. This is called pressing and holding the trigger or commonly known as squeezing the trigger and following through with the shot. Again we are not squeezing, we are pressing and holding.

It is important to practice dry firing with your trigger control to insure that your trigger finger is properly placed on the trigger and that it is not interrupting the grip of the pistol. A common problem is that the trigger finger is interrupting the grip of the pistol and will cause the sights to move while pressing the trigger. If this is taking place, adjust the trigger finger until the movement in the sights has stopped.

Trigger.jpg
 
Breathing Control (Natural & Forced)

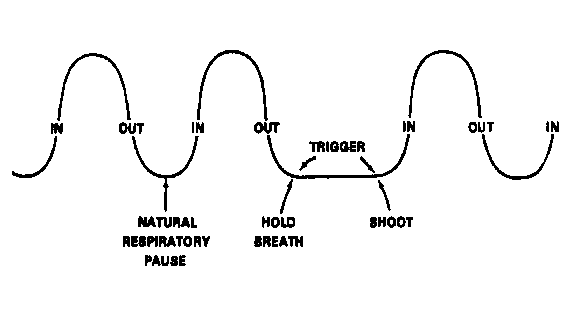
Breathing is as important to precision shooting as it is to tactical shooting. The first thing to diminish on the human body from a lack of oxygen is the eyes. This can take place from someone holding his or her breath for as short as 3 to 5 seconds. Being that our eyes are incredibly important to accurately shooting the pistol, you must ensure to keep them charged with oxygen. In other words, do not hold your breath for too long and be sure to inhale a breath of air every chance you get.

A natural breath control is the natural pause in the breathing cycle that takes places on the exhale. As you exhale, your body will naturally pause before taking another breath in. I believe this to be the best time to fire the shot because your body is at a natural rest and breathing pause and it is consistent every time. Some will say to break the shot with half a breath in or out and then to pause, but I find it very hard to maintain a consistency in doing so.

Forced breathing pause is where you simply stop inhaling or exhaling. You are telling your lungs to stop what they are doing and holding it. I find that a forced pause is more common in pistol shooting and more so in tactical or practical shooting. So I practice a forced pause while shooting in order to build a solid consistency. I have found that the best way to do a forced pause is again to exhale all the air out of your lungs and fire the shot, and then inhale/ exhale and fire again. I found that I can maintain a forced pause using this technique for 3 to 5 seconds and this allows me to make several shots prior to doing another inhale/ exhale.

BreathingXX.gif
 
Thanks ;)

Here is a video by Kyle Lamb regarding point shooting and why its dumb! :evil:

[ame]http://www.youtube.com/watch?v=s3nGbN7RxpI[/ame]

I figure it's better to hear it from a guy at the level of god with a gun... ;)
 
I would say your support hand needs some better positioning. The support hand plays a vital role in recoil management, which in turn plays a role in follow through and multiple shots. Rotating your support hand forward until the ligaments are locked gives you a fixed position to return to after a shot has been fired. With your wrist "loose" you are playing a guessing game as to where the gun will settle after a shot. With approximately 60-70 percent of your recoil management coming from your support hand I'd say it's an important detail.
 
I would say your support hand needs some better positioning. The support hand plays a vital role in recoil management, which in turn plays a role in follow through and multiple shots. Rotating your support hand forward until the ligaments are locked gives you a fixed position to return to after a shot has been fired. With your wrist "loose" you are playing a guessing game as to where the gun will settle after a shot. With approximately 60-70 percent of your recoil management coming from your support hand I'd say it's an important detail.

I am going to have to disagree with you; the “support hand” shares in absorbing recoil but should not be taking the blunt of the recoil. The recoil should be shared between both arms. I mean think about what you are saying; the recoil is going to go into my support arm more so then my firing side. That would cause you to receive more recoil to one side then the other, causing your follow through to shift to that side. :uhh:

You want your recoil to be straight up and your follow through straight back down to the point of aim when firing rapid shots, not bouncing off of the target to the left or right due to on even recoil in the grip/ extension.

As for locking the wrist ligaments that will be shooter dependent. Not everyone can shoot that way due genetic structure and/ or disabilities. However you are correct that locking the wrist as far out as possible will give you better consistency. My wrist is as forward as it will go and fully locked, however my thumb is resting higher due to comfort and my consistency of my grip.
 
That's fine, you can disagree. Your grip and recoil management being dominant in the support hand won't cause any shift to one side. You have a way, I would use another. Rock on dude.
 
I only let out half a breath on the exhale but thats just the way I was taught Bro. I lock my arms like you do and rotate the elbows out to tighten up.

What are your thoughts on trigger programming? Our versions of the Kyle Lambs taught me to shoot pistol and they had us pair up. The firer would pass the pistol to the rear/side and the buddy would either chamber a round and decock or rack the slide and decock on an empty chamber then pass it forward and the firer would take aim and fire. Sometimes it went click sometimes it went bang. They said it was to teach us to stop anticipating the recoil and concentrate more on the trigger pull and sight picture. Is it a common practice for you guys as well?

P.S. You have Yeti arms...

It's called the ball and dummy drill and it (and it's different iterations) is a fantastic training tool.
 
That's fine, you can disagree. Your grip and recoil management being dominant in the support hand won't cause any shift to one side. You have a way, I would use another. Rock on dude.

I am wondering as to how you are absorbing 60 to 70% of the recoil in the non-firing hand? The recoil of the pistol, being the backwards motion of the pistol met with the resistance of the grip/ extension of the arms.

Being that the firing hand is the hand covering the back strap of the pistol and thus causing the main resistance to the pistol during recoil.

Are you by chance meaning “driving” the pistol with the non-firing hand during recoil? Like as if you are shooting multiple targets for speed, such as a bank of steel plates?

Thanks in advance “dude”.

I only let out half a breath on the exhale but that’s just the way I was taught Bro. I lock my arms like you do and rotate the elbows out to tighten up.

What are your thoughts on trigger programming? Our versions of the Kyle Lambs taught me to shoot pistol and they had us pair up. The firer would pass the pistol to the rear/side and the buddy would either chamber a round and decock or rack the slide and decock on an empty chamber then pass it forward and the firer would take aim and fire. Sometimes it went click sometimes it went bang. They said it was to teach us to stop anticipating the recoil and concentrate more on the trigger pull and sight picture. Is it a common practice for you guys as well?

P.S. You have Yeti arms...

I love ball and dummy and use it on my self as well as in my classes; it is great for working out anticipations of recoil problems. The thing that makes it most affective is stopping the shooter when he/ she has an anticipation of recoil, having them dry fire it out before chambering another round. It’s a pain in the ass with pistols that do not have an external hammer. However it can still be done.

Another great drill is calling the shot; using a 25-yard bulls eye target or a paper plate. Have the shooter call out to the coach where he last saw the front sight, when the shooter broke the shot, and then have the coach confirm that is where the shot actually broke. This helps on getting the shooter to maintain focus on the front sight and forces them to call the placement of that shot.

I will post some of my drills up later this afternoon…
 
When I am shooting from a rest, I am a squeeze shooter, other wise I am a snap shooter. I don't know if they teach that anymore.

Great thread and good read.

I might have missed the discussion on POA and POI when in reference to sight picture. Target shooting POA seems best, combat shooting POI, seems that way to me.
 
Good post for basics. Good on ya for the work. It should be helpful to quite a few readers here. Rep!

I have to say, the support hand rotated further forward does help. It's not so much for taking up more of the recoil rearward, but for helping keep the muzzle down for continuing shots, as well as keeping the alignment left and right, offsetting trigger input. That's how I was taught by John Shaw, Jerry Barnhart and a few others. If the support hand is rotated as far forward as it will go, it's a natural lock to keep the weapon right on target. It's a stronger grip than when it's rotated back a bit, due to the geometric angle and the tendons being locked in place. It's best demonstrated in quicker follow up shots and will become evident in rapid shot drills with tight time restrictions.

Now, here's a real kicker. Back when we went from the thumb over grip to the thumbs forward grip, it was because that was determined to be the new latest and greatest grip. The reasoning was that it allowed greater surface contact between the hands and the weapon. Made sense to me. This was obviously supposed to provide a more stable grip. It was also good for providing a natural pointing instinct with the thumbs, as if to say, "Hey you!" So, we've been shooting that way since the late 80's for those reasons.

However, one martial arts guy (who I won't name) pointed out that if you take a pistol and grab it with the thumbs forward grip and have someone else severely shake the weapon, it's much LESS stable that if you grip the weapon with the thumb over grip. I found him to be correct. :eek: Hmmmm...

I don't mean to screw up anybody's homeostasis, just sharing some scoop. I'll have to admit, even though I saw his logic, I haven't yet switched back to the thumb over and I'm not sure I will. I'll burn a few more cases of ammo testing back and forth to see which I ultimately settle on.

Do what you like. I WOULD suggest just grabbing a red gun and testing the grips like I described, just so you know. Interesting development.
 
Sawman, Maybe that has to do with different shooting styles for different shooting situations. Combat shooting would require a better grip, especially in CQC. Target shooting, the grip is not to secure the pistol as much to produce a more accurate shot. In Accuracy there are different types or needs. Hunting VS Target is a a example. That can effect how one chooses a sighting system, ammo and firearm. Highly developed forms of shooting, promotes styles that can be almost exclusive for that type of shooting.

For a carbine in CQC, I tend not to use sights (RVN Tactic). Sights are not as bad as scopes in creating a myopic view (tunnel vision). I tried a EOtech (Holographic sight) and it is pretty much like not using the sights. I used the holographic sight in a peripheral manner and my focus was beyond my rifle, scanning. That the way it seems to me ho it should work. I am kind of guessing here. If I am way off base, let me know. I don't mind learning new high tech methods.

NO we did not use Buck N Ball in RVN.
 
Good job JAB. Funny thing is, I teach exactly the same way you wrote and I too took pictures for my classes. Hell except for your 550 cord bracelet, some of the pis could be the same....except for the yeti arms.;)
 
I know it's not 100% correct, but I still like my trigger finger all the way in to the first joint rather than the tip/pad as it looks like in your pic. Excellent post on the breathing bro, that's the way I was tought 30yrs ago, and it WORKS!
 
I have to say, the support hand rotated further forward does help. It's not so much for taking up more of the recoil rearward, but for helping keep the muzzle down for continuing shots, as well as keeping the alignment left and right, offsetting trigger input. That's how I was taught by John Shaw, Jerry Barnhart and a few others. If the support hand is rotated as far forward as it will go, it's a natural lock to keep the weapon right on target. It's a stronger grip than when it's rotated back a bit, due to the geometric angle and the tendons being locked in place. It's best demonstrated in quicker follow up shots and will become evident in rapid shot drills with tight time restrictions.

Yep. I wasn't going to name drop but that's the way I was taught by VERY good, experienced shooters and I'll stick with it.

Thanks for working on a project like that. It could be very helpful to new shooters.
 
Back
Top